 Save
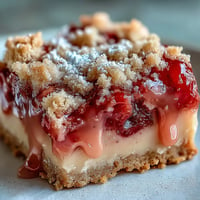
Save My sister showed up one Saturday with a bag of white chocolate chips and a pint of raspberries, insisting we needed to make something special for her book club that night. We had no plan, just a hunch that tangy fruit and creamy sweetness would sing together. By the time we pulled that cheesecake from the oven, the kitchen smelled like a bakery and we both knew we'd stumbled onto something worth repeating. It's been my go-to showstopper ever since, the kind of dessert that makes people lean back in their chairs and sigh.
I made this for my best friend's birthday dinner, and she actually teared up when I brought it to the table. She's not usually sentimental about food, but the combination of creamy filling and tart fruit hit her right in the heart. We ended up eating half the cheesecake that night, just the two of us, laughing about old memories and scraping our forks across the plate. It became our tradition after that, a cheesecake for every milestone, every quiet celebration that deserved something sweet and memorable.
Ingredients
- Graham cracker crumbs: The buttery, slightly sweet base that holds everything together, press it down firmly so it doesn't crumble when you slice.
- Granulated sugar: Used in the crust, raspberry sauce, and batter to balance tartness and enhance the creamy texture.
- Melted butter: Binds the crumbs into a golden, crisp crust that tastes like childhood summers.
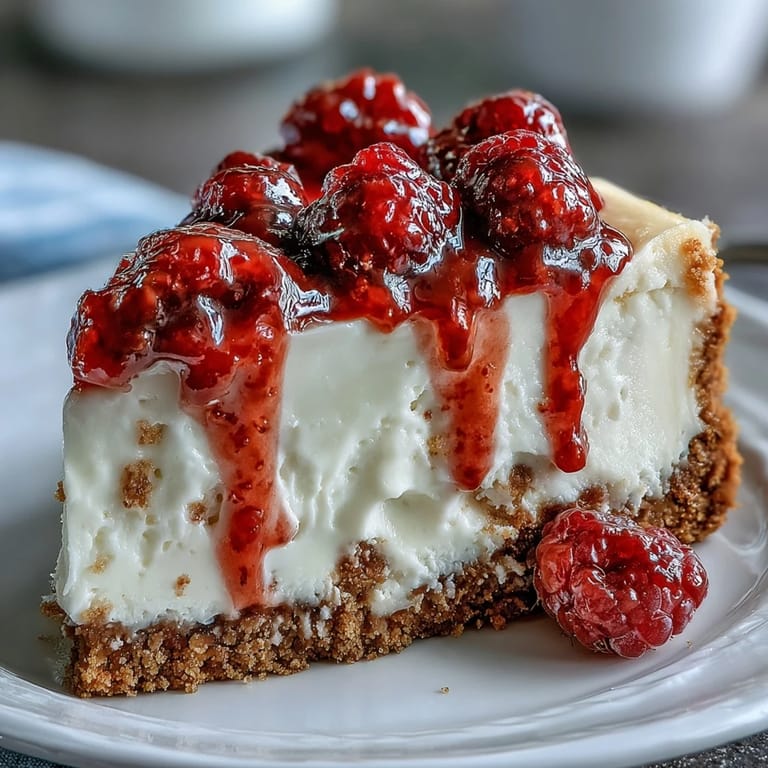
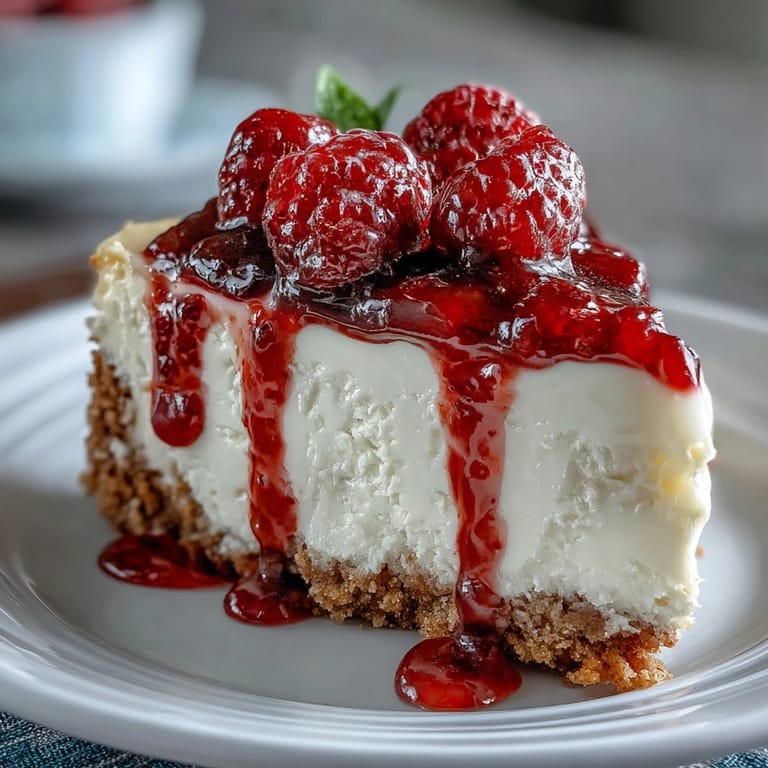
- Fresh or frozen raspberries: The tart, jewel toned heart of this dessert, frozen work just as well if fresh aren't in season.
- Lemon juice: A tiny splash brightens the raspberry sauce and keeps it from tasting flat.
- White chocolate: Chopped and melted into the batter, it adds a silky richness without overpowering the fruit.
- Cream cheese: Softened to room temperature, it whips into the smooth, tangy base that defines a great cheesecake.
- Eggs: They give structure and lift, but handle them gently to avoid a dense texture.
- Vanilla extract: A warm, familiar note that ties all the flavors together.
- Sour cream: Adds a subtle tang and keeps the filling impossibly creamy.
- Heavy cream: Thins the batter just enough to pour and swirl beautifully.
Tired of Takeout? 🥡
Get 10 meals you can make faster than delivery arrives. Seriously.
One email. No spam. Unsubscribe anytime.
Instructions
- Prepare the pan and preheat:
- Grease your springform pan and line the bottom with parchment, then set your oven to 325 degrees. This little bit of prep makes all the difference when it's time to release that perfect cheesecake.
- Build the crust:
- Mix graham cracker crumbs, sugar, and melted butter until it looks like wet sand, then press it firmly into the pan base. Bake for 8 minutes until it smells toasty and golden, then let it cool completely before adding the filling.
- Make the raspberry sauce:
- Simmer raspberries, sugar, and lemon juice in a small saucepan over medium heat, stirring often, until it thickens into a glossy sauce. Strain out the seeds if you want it silky smooth, then let it cool while you work on the batter.
- Melt the white chocolate:
- Use a double boiler or microwave in short bursts, stirring between each round, until the chocolate is completely smooth. Let it cool slightly so it doesn't scramble the eggs when you fold it in.
- Beat the cream cheese base:
- Whip the softened cream cheese and sugar together until it's fluffy and smooth, scraping down the sides of the bowl as you go. Add the eggs one at a time, beating gently after each addition to keep the texture light.
- Finish the batter:
- Stir in vanilla, sour cream, and heavy cream until everything is silky and uniform, then fold in the melted white chocolate. The batter should be pale, rich, and pour like thick cream.
- Layer and swirl:
- Pour half the batter over the cooled crust, dollop half the raspberry sauce on top, and swirl gently with a knife. Add the rest of the batter, then swirl in the remaining sauce for those gorgeous marbled ribbons.
- Set up the water bath:
- Wrap the outside of the springform pan tightly in two layers of foil, then place it in a larger roasting pan. Pour hot water into the roasting pan until it reaches halfway up the sides of the springform, this keeps the cheesecake from cracking.
- Bake low and slow:
- Slide the whole setup into the oven and bake for 60 to 70 minutes, until the edges are set but the center still has a gentle wobble. Turn off the oven, crack the door, and let the cheesecake cool inside for an hour to prevent sudden temperature shocks.
- Chill and serve:
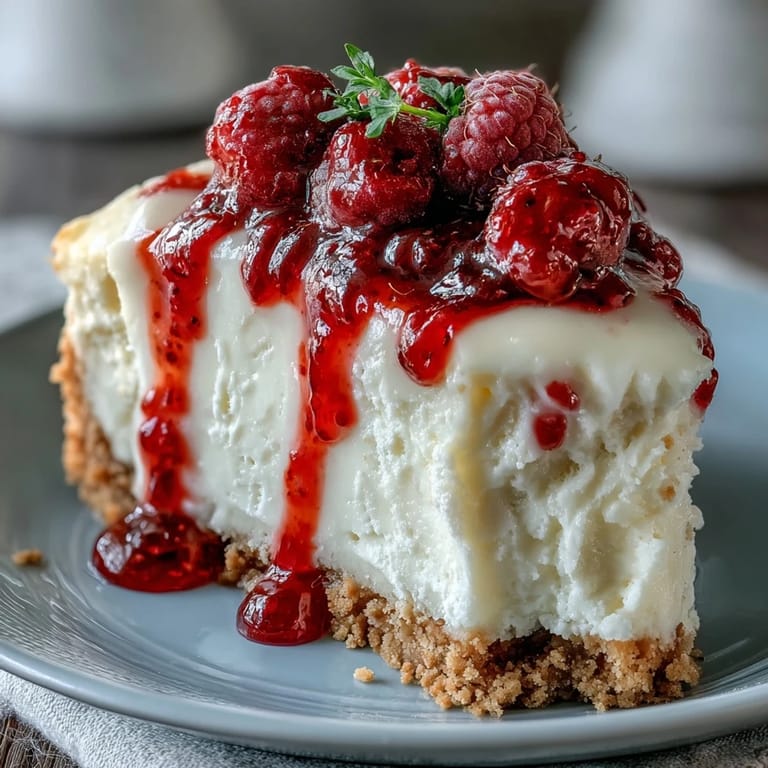
- Remove the cheesecake from the water bath and refrigerate for at least 4 hours or overnight. Before serving, release the springform, top with extra raspberry sauce or fresh berries, and slice with a hot, clean knife for picture perfect wedges.
 Save
Save The first time I served this at a dinner party, a guest asked if I'd ordered it from a bakery. I laughed and admitted it was homemade, and suddenly everyone wanted the recipe. It's funny how a dessert can turn into a conversation starter, how something you made with your own hands can make people feel cared for. That's when I realized this cheesecake wasn't just about taste, it was about the pride of pulling off something beautiful and the joy of sharing it with people who matter.
Storing and Make Ahead Tips
This cheesecake actually tastes better the day after it's made, once the flavors have had time to settle and marry in the fridge. You can bake it up to two days ahead, wrap it tightly in plastic, and keep it chilled until you're ready to serve. If you need to freeze it, do so without the topping, wrap it well, and thaw it overnight in the fridge before garnishing. I've even frozen individual slices for those nights when I needed a fancy dessert in a pinch, and they held up beautifully.
Customizing Your Cheesecake
Once you've mastered the base, it's easy to play around with the flavors and make this cheesecake your own. Swap the raspberries for strawberries, blackberries, or even a tart cherry compote if that's what you have on hand. You can fold in a handful of white chocolate chips for extra bursts of sweetness, or add a splash of almond extract to the batter for a subtle nutty note. I've also drizzled melted dark chocolate over the top for a dramatic finish, and it never fails to impress.
Serving Suggestions and Pairings
This cheesecake shines on its own, but a dollop of fresh whipped cream or a scoop of vanilla ice cream takes it over the top. I like to serve it with a light, fruity wine like Moscato or a glass of sparkling rosé, the bubbles cut through the richness beautifully. For a more casual vibe, pair it with strong coffee or a cup of Earl Grey tea.
- Garnish with fresh mint leaves for a pop of color and a hint of freshness.
- Dust the top lightly with powdered sugar just before serving for an elegant, bakery style finish.
- Serve slightly chilled but not ice cold, the flavors really open up when it's not straight from the fridge.
 Save
Save Every time I make this cheesecake, I'm reminded that the best desserts aren't just about following a recipe, they're about the moments they create. Whether it's a birthday, a quiet Sunday, or just because you deserve something indulgent, this one never disappoints.
Recipe FAQs
- → Why is a water bath necessary for cheesecake?
A water bath creates gentle, humid heat that prevents the cheesecake from cracking and promotes even cooking. The steam helps maintain a creamy texture throughout while keeping the center from overcooking before the edges set properly.
- → How long should the cheesecake cool before refrigerating?
Allow the cheesecake to cool gradually in the oven with the door cracked for one hour after baking. This prevents sudden temperature changes that can cause cracking. Then refrigerate for at least 4 hours, though overnight chilling yields the best texture and flavor.
- → Can I use frozen raspberries instead of fresh?
Yes, frozen raspberries work perfectly for the sauce. They may actually release more liquid during cooking, creating a thicker consistency. Taste and adjust sugar accordingly since frozen berries can sometimes be slightly more tart than fresh ones.
- → How do I prevent cracks from forming on the surface?
Avoid overmixing the batter after adding eggs, use a water bath, and cool the cheesecake gradually in the oven. Running a knife around the edge immediately after baking helps prevent cracking as the cheesecake contracts during cooling.
- → Can this cheesecake be made ahead of time?
This cheesecake actually improves after resting overnight. The flavors meld together beautifully, and the texture becomes more stable. You can make it up to 3 days in advance, keeping it tightly wrapped in the refrigerator. Add fresh garnish just before serving.
- → What's the best way to achieve clean slices?
Dip a sharp knife in hot water and wipe it clean between each slice. The heat helps cut through the creamy filling smoothly, while keeping the blade clean prevents messy dragging. Run the knife under warm water and dry thoroughly for every cut.