 Save
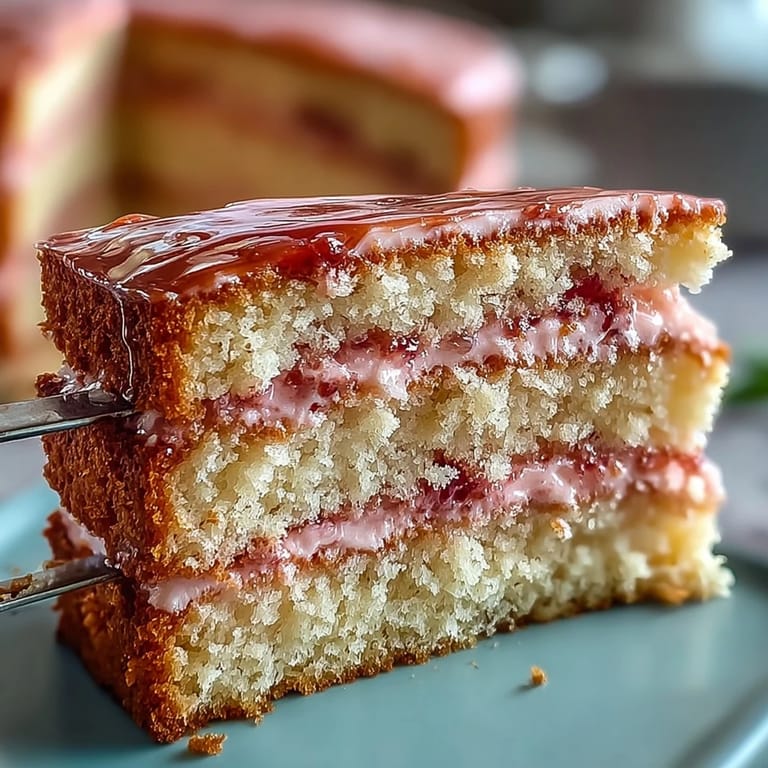
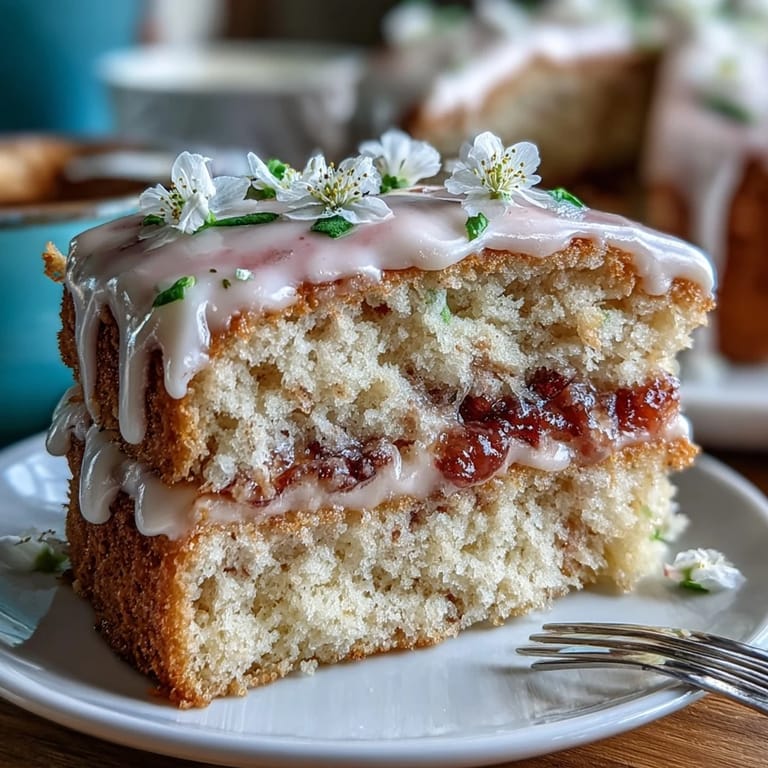
Save There's something magical about a cake that captures the essence of spring in every delicate layer. This stunning ombre creation combines soft pastel pink and yellow hues that blend seamlessly into one another, creating a visual masterpiece that tastes just as dreamy as it looks. Whether you're celebrating a birthday, bridal shower, or simply welcoming warmer days, this layered sponge cake with silky buttercream is designed to impress. The tender crumb, paired with the smooth gradient frosting, makes every slice a work of art worth savoring.
Save The beauty of this Spring Ombre Cake lies not just in its appearance, but in the thoughtful technique behind it. By dividing your batter and frosting into separate bowls and tinting them with gel food coloring, you create distinct layers that transition gracefully from sunny yellow to soft pink. The key is using a gentle hand with the coloring to achieve those delicate pastel shades that evoke springtime blooms and gentle sunshine. When assembled and frosted with the ombre technique on the sides, this cake becomes a showstopper that's surprisingly approachable for the home baker.
Ingredients
Tired of Takeout? 🥡
Get 10 meals you can make faster than delivery arrives. Seriously.
One email. No spam. Unsubscribe anytime.
- Cake Batter: 3 cups (375 g) all-purpose flour, 2 ½ tsp baking powder, ½ tsp salt, 1 cup (226 g) unsalted butter at room temperature, 2 cups (400 g) granulated sugar, 4 large eggs at room temperature, 1 tbsp pure vanilla extract, 1 cup (240 ml) whole milk at room temperature
- Food Coloring: Pink gel food coloring, yellow gel food coloring
- Buttercream Frosting: 1 ½ cups (340 g) unsalted butter at room temperature, 5 cups (600 g) powdered sugar (sifted), 2 tsp pure vanilla extract, 3–4 tbsp (45–60 ml) milk or heavy cream, pinch of salt, pink and yellow gel food coloring
Instructions
- Step 1: Prepare pans and oven
- Preheat oven to 350°F (175°C). Grease and line three 8-inch (20 cm) round cake pans with parchment paper.
- Step 2: Mix dry ingredients
- In a medium bowl, whisk together flour, baking powder, and salt.
- Step 3: Cream butter and sugar
- In a large bowl, beat butter and sugar together on medium speed until light and fluffy (about 3–4 minutes).
- Step 4: Add eggs and vanilla
- Add eggs one at a time, beating well after each addition. Mix in vanilla extract.
- Step 5: Combine wet and dry
- Alternately add flour mixture and milk to the butter mixture, beginning and ending with the flour, mixing just until combined.
- Step 6: Divide and color batter
- Divide batter evenly into three bowls. Tint one bowl with a small amount of pink food coloring for a pale pink, tint the second with a small amount of yellow for pale yellow, and leave the third bowl plain or add a drop of both for a pastel peach if desired.
- Step 7: Bake the layers
- Pour each colored batter into prepared pans. Smooth tops and bake for 22–26 minutes, or until a toothpick inserted into the center comes out clean.
- Step 8: Cool completely
- Cool cakes in pans for 10 minutes, then turn out onto wire racks to cool completely.
- Step 9: Make buttercream
- For the buttercream, beat butter on medium-high speed until creamy. Gradually add powdered sugar, vanilla, salt, and 3 tbsp milk/cream; beat until fluffy (add more milk if needed).
- Step 10: Color the frosting
- Divide frosting into three bowls. Tint one bowl pastel pink, one pastel yellow, and leave one plain.
- Step 11: Assemble the layers
- To assemble, level cake layers if necessary. Place yellow cake layer on serving plate, spread with yellow buttercream. Top with peach or uncolored layer, frost with plain buttercream. Top with pink layer, frost with pink buttercream.
- Step 12: Create ombre effect
- Use remaining frosting to ombre the sides, blending from yellow at the base to pink at the top for a gradient effect. Smooth with a cake scraper or spatula.
- Step 13: Decorate and chill
- Decorate with pastel sprinkles, edible flowers, or as desired. Chill 30 minutes before slicing for cleaner cuts.
Zusatztipps für die Zubereitung
To achieve the smoothest ombre effect on the sides of your cake, use an offset spatula to apply the different colored frostings in horizontal bands, then use a cake scraper or bench scraper to gently blend the colors while rotating the cake on a turntable. For best results, all ingredients should be at room temperature before you begin—this ensures proper emulsification and a tender crumb. If your buttercream becomes too soft while working, refrigerate it for 10–15 minutes to firm up slightly. When dividing batter between bowls, use a kitchen scale for the most even layers. Gel food coloring is preferred over liquid because it won't thin out your batter or frosting and provides more vibrant, controlled color.
Varianten und Anpassungen
For a more vibrant ombre effect, use more food coloring in each layer to create bolder color transitions. Substitute buttermilk for the whole milk to add a subtle tang and extra tenderness to the cake layers. You can also experiment with different color combinations—try lavender and mint green for an Easter theme, or coral and peach for a summer celebration. For a chocolate variation, replace ½ cup of flour with cocoa powder in one or more layers. If you prefer a less sweet frosting, try a Swiss meringue buttercream or cream cheese frosting instead. For those avoiding food coloring, natural alternatives like beet powder (pink) and turmeric (yellow) can provide subtle hues, though the colors will be more muted.
Serviervorschläge
This Spring Ombre Cake pairs beautifully with a glass of Moscato or sparkling lemonade for a refreshing complement to the sweet buttercream. Serve at room temperature for the softest texture and best flavor—remove from the refrigerator 30 minutes before serving if chilled. Garnish individual slices with fresh berries, edible flowers like pansies or roses, or a light dusting of edible glitter for extra sparkle. The cake is substantial enough to stand alone as dessert, but a small scoop of vanilla bean ice cream or a dollop of lightly sweetened whipped cream makes an elegant addition. For a beautiful presentation, serve on white or clear glass plates to let the pastel colors shine through.
 Save
Save Creating this Spring Ombre Cake is more than just baking—it's an experience of bringing color, flavor, and celebration together in one stunning dessert. The process may take some time with the cooling and decorating, but the result is a cake that will have everyone reaching for their cameras before their forks. With its tender crumb, silky frosting, and eye-catching gradient, this cake embodies everything we love about spring: freshness, beauty, and the joy of gathering with loved ones. Whether you're an experienced baker looking for your next showstopper or someone ready to challenge yourself with a medium-difficulty project, this ombre masterpiece is sure to become a treasured recipe in your collection.
Recipe FAQs
- → How do I achieve the pastel ombre effect?
Divide the batter into three parts and tint each with a small amount of pink, yellow, or leave plain. Layer and frost accordingly for a smooth gradient.
- → What is the best way to make the layers even?
Use three identical pans and level layers with a serrated knife or cake leveler after baking and cooling.
- → Can I substitute ingredients for dietary needs?
Buttermilk can replace regular milk for a tangier flavor. Adjust liquids if using alternatives, but keep butter for texture.
- → How long should the cake chill before serving?
Chill the assembled and frosted cake for at least 30 minutes to allow the buttercream to set and ensure clean slicing.
- → What decorations complement the pastel look?
Pastel sprinkles, edible flowers, or light dustings of powdered sugar enhance the soft ombre appearance without overpowering it.
- → How to store the finished cake to maintain freshness?
Keep it covered at room temperature for up to one day, or refrigerate for up to four days to retain moisture.